¶ Add and Manage Tools and Shops (and Print the Checkout Required Sign)
Each shop has a list of tools in the portal. A tool's settings decide whether it needs a checkout, who is told about requests, and what members see. Resource Managers (RMs) manage the tools in their own shops. Admins and board members can manage every shop.
Open Tool Checkouts. As a Resource Manager you see the tabs My Checkouts, Requests, Checkout Roster, Shops, Tools and Shop Map. Use the Tools tab for tools and the Shops tab for shops. A tool with the same name can exist in two shops, and they are tracked separately.
¶ The Tools tab
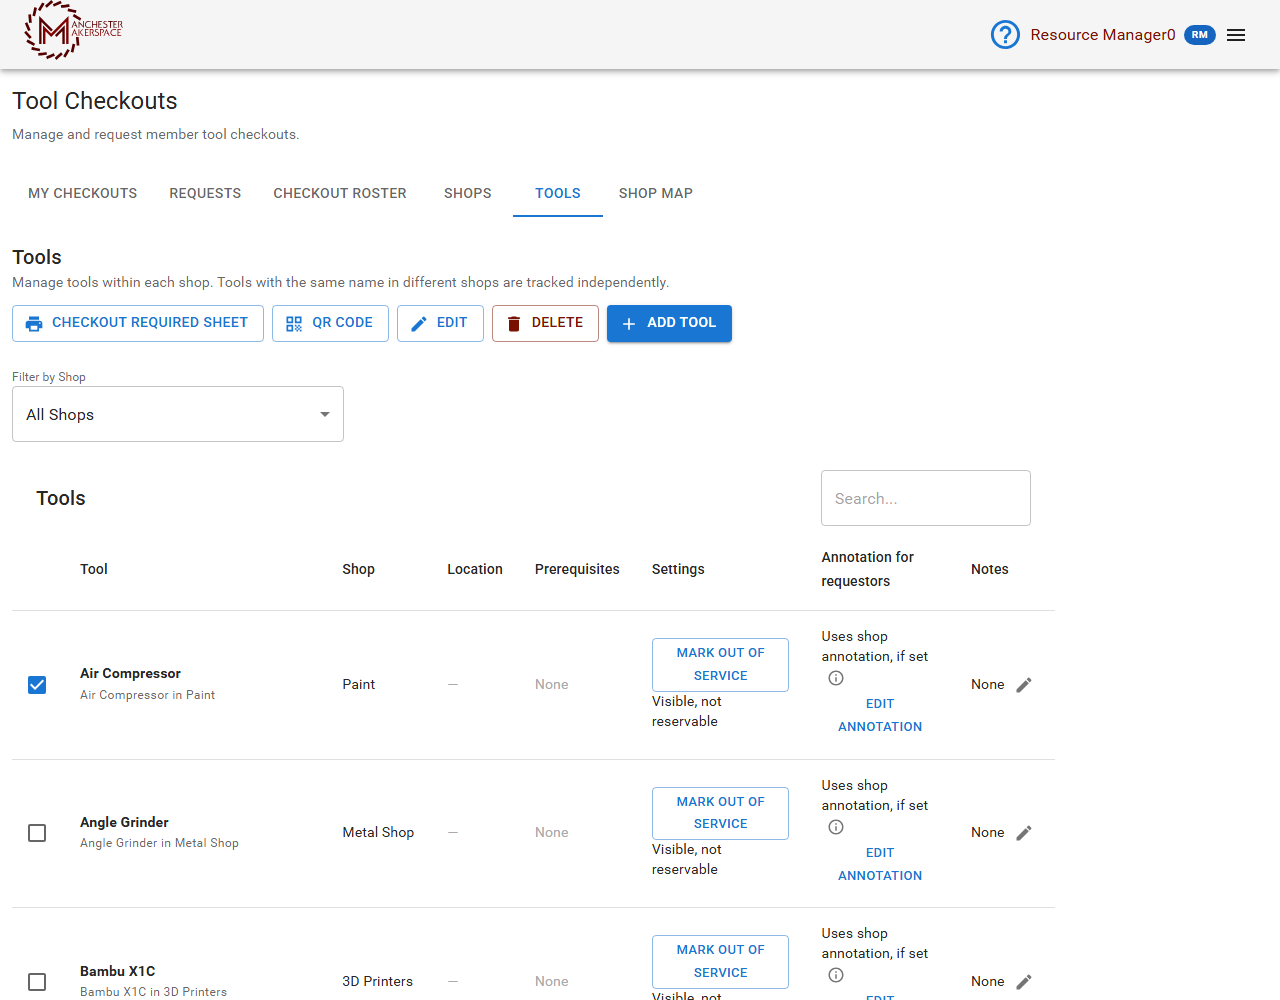
The table shows each tool's name and shop, its Location, any Prerequisites, its settings, its Annotation for requestors, and its Notes. Use Filter by Shop to narrow it down.
- On each row, Mark out of service, Edit annotation, and the pencil beside Notes are quick edits.
- Tick a tool and four buttons appear: Checkout Required Sheet, QR Code, Edit and Delete.
- Add Tool is always at the top.
¶ Add a tool
- On the Tools tab, click Add Tool.
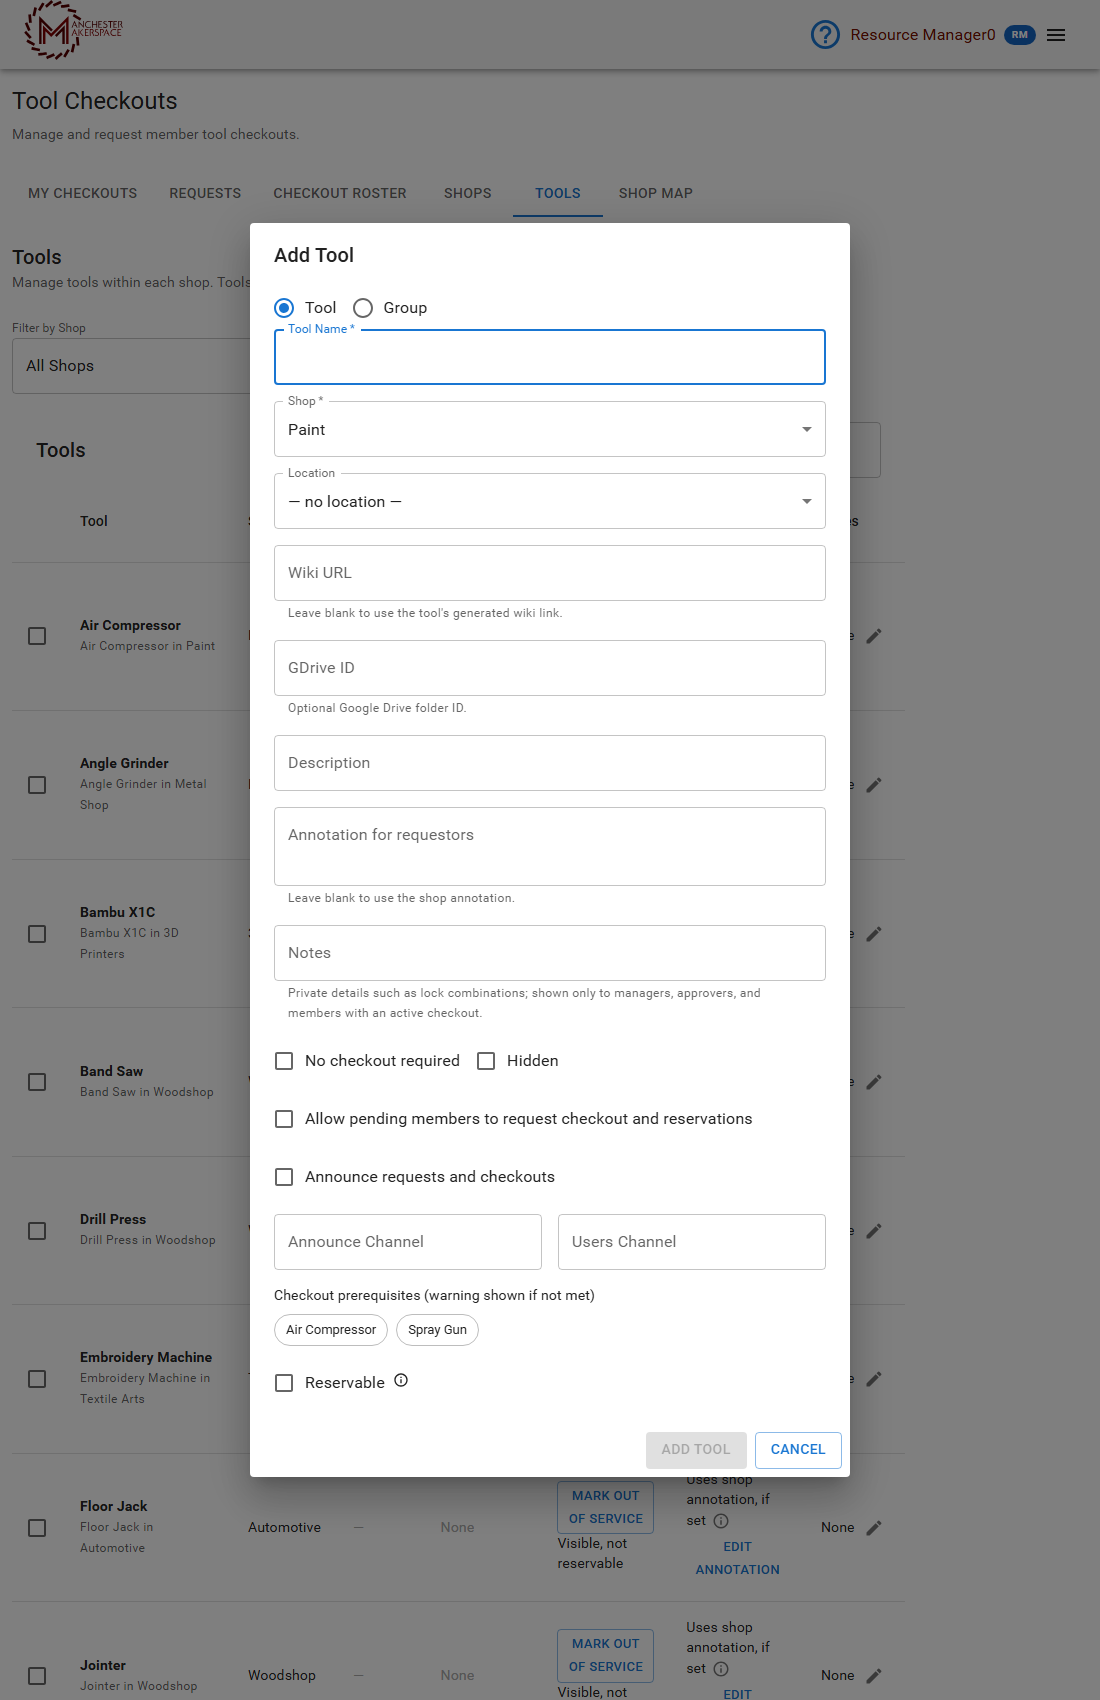
- Choose the Resource type: Tool for one physical tool, or Group for a set of related tools approved together (see Tool groups and approvers).
- Fill in the fields below, then click Add Tool. Click Cancel to close without saving.
| Field | What it does |
|---|---|
| Tool Name (required) | What members see. Must be unique within the shop. |
| Shop (required) | The shop the tool belongs to. |
| Location | Where the tool is on the shop map. Choose from the shop's mapped locations, or leave it on no location. |
| Wiki URL | Optional. Leave blank to use the tool's automatically generated wiki link. |
| GDrive ID | Optional Google Drive folder ID for the tool's files. |
| Description | A short description shown to members. |
| Annotation for requestors | A note sent to members after they request a checkout. Leave blank to use the shop's note. |
| Notes | Private details, such as a lock combination. Shown only to managers, approvers and members with an active checkout. |
| No checkout required | Tick for tools anyone may use. They cannot be requested and no sign is printed. |
| Hidden | Takes the tool out of member-facing lists. |
| Allow pending members to request checkout and reservations | Lets members who have signed up but are not fully active yet request this tool. Leave it off where full membership should come first. |
| Announce requests and checkouts | Posts a message in the tool's channel whenever a request or checkout happens. |
| Announce Channel | The Slack channel for those posts. Leave blank to use the shop's channel. |
| Users Channel | A Slack channel for the people checked out on this tool. Members are added automatically when checked out. |
| Checkout prerequisites | Other tools in this shop that a member must be checked out on first. A warning shows if they are not met. |
| Reservable | Whether the tool can be reserved. |
¶ Edit or remove a tool
Tick the tool and click Edit to change any field. Delete removes the tool after you confirm. It is refused if the tool has current or future reservations (cancel them first) or if another tool lists it as a prerequisite. Deleting a tool also removes it from approvers' scopes. If you only want to stop members seeing a tool for a while, use Hidden or Mark out of service instead.
¶ Mark a tool out of service
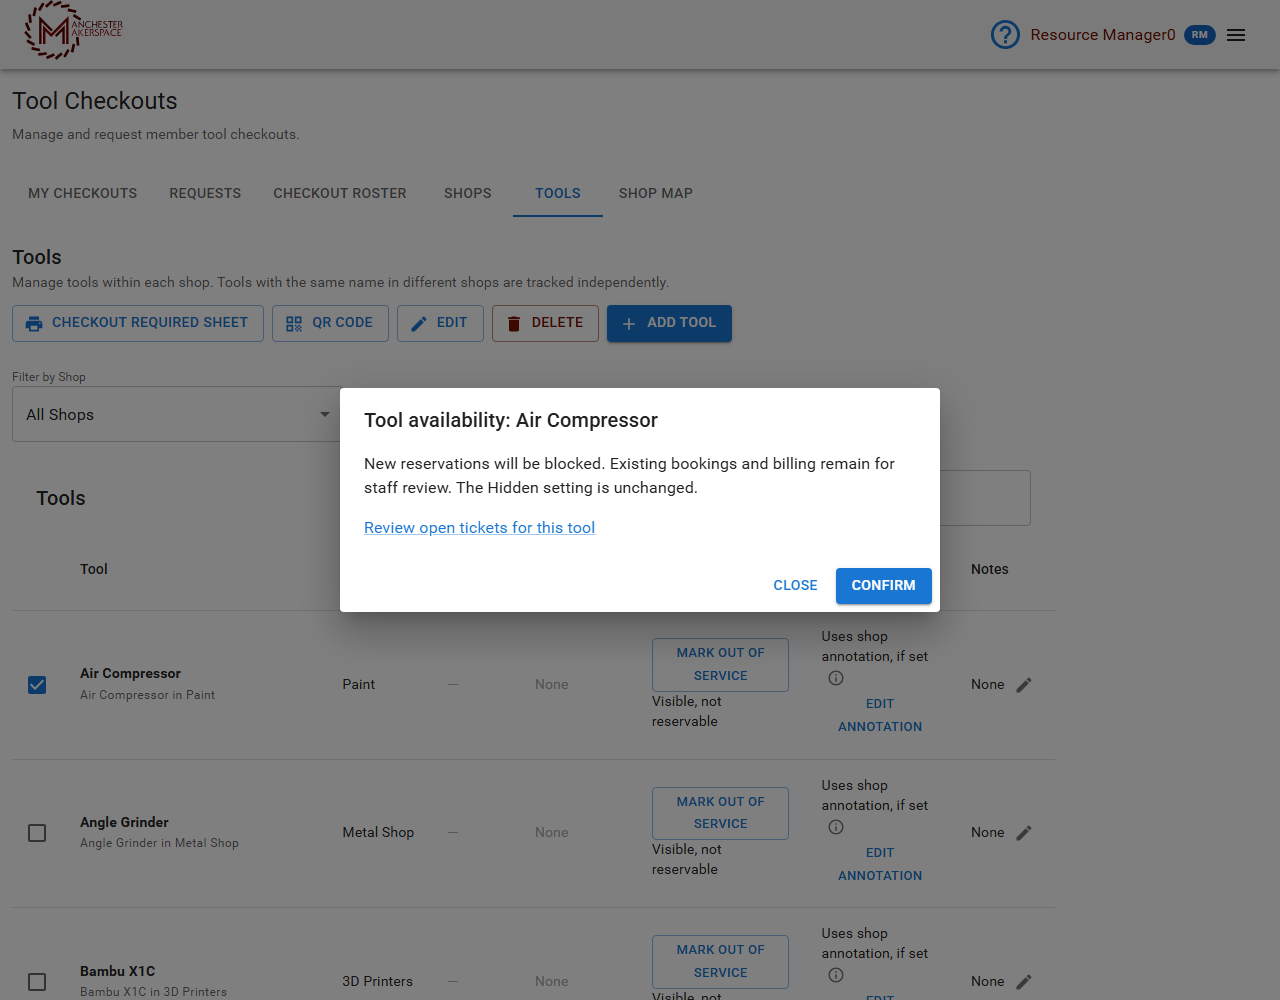
Click Mark out of service on the tool's row. A box titled Tool availability opens. It explains that new reservations will be blocked, that existing bookings and billing remain for staff review, and that the Hidden setting is unchanged. It also links to Review open tickets for this tool. Click Confirm to apply it, or Close to cancel.
¶ The Shops tab
The table shows each shop, its Slack Channel, whether it takes reservations, its Annotation for requestors, and how many tools it has. As a Resource Manager you can click Edit annotation on a row to change the note sent to members after a request. Tick a shop to get QR Code, Checkout Required Sheet and Edit.
¶ Edit a shop
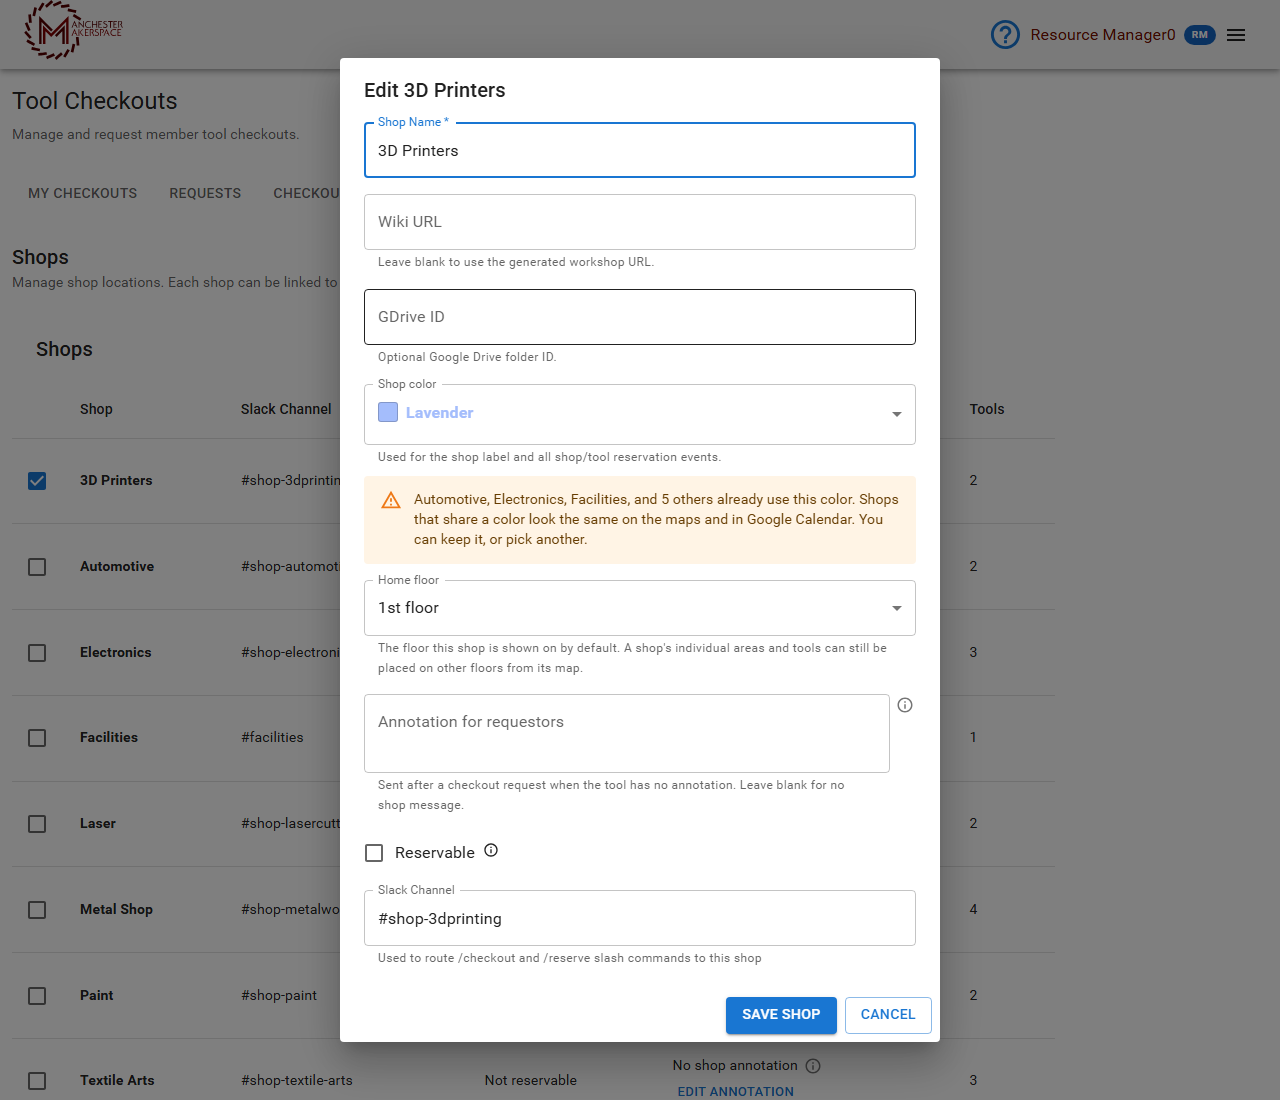
Tick the shop and click Edit. The box lists:
| Field | What it does |
|---|---|
| Shop Name (required) | For example, Woodshop. |
| Wiki URL | Optional. Leave blank to use the generated workshop link. |
| GDrive ID | Optional Google Drive folder ID. |
| Shop color | Used for the shop's label and its reservation events. If other shops share the color, a warning says so, because they will look the same on the maps and in Google Calendar. |
| Home floor | The floor the shop shows on by default (Basement, 1st floor or 2nd floor). |
| Annotation for requestors | Sent after a checkout request when the tool has no note of its own. Leave blank for none. |
| Reservable | Whether the shop can be reserved. |
| Slack Channel | The shop's channel, for example #shop-woodworking. This is how /checkout and /reserve in Slack know which shop a command is for. Set it, or the Slack commands and the printed sign will have no channel. |
Adding a new shop, deleting one, and assigning its Resource Managers are done by admins and board members.
¶ Print the "Checkout Required" sign
Every tool that requires a checkout should carry the sign with the QR code that starts a request.
- On the Tools tab (or the Shops tab, or the Workshops page), tick the tool or shop and click Checkout Required Sheet.
- Choose Signs per sheet: Two signs (the default, stacked on one page) or One sign (a single centered sign).
- Check the preview, then click Download SVG.
- Open the file and print it on US Letter, landscape, at 100% / actual size. Do not choose "fit to page".
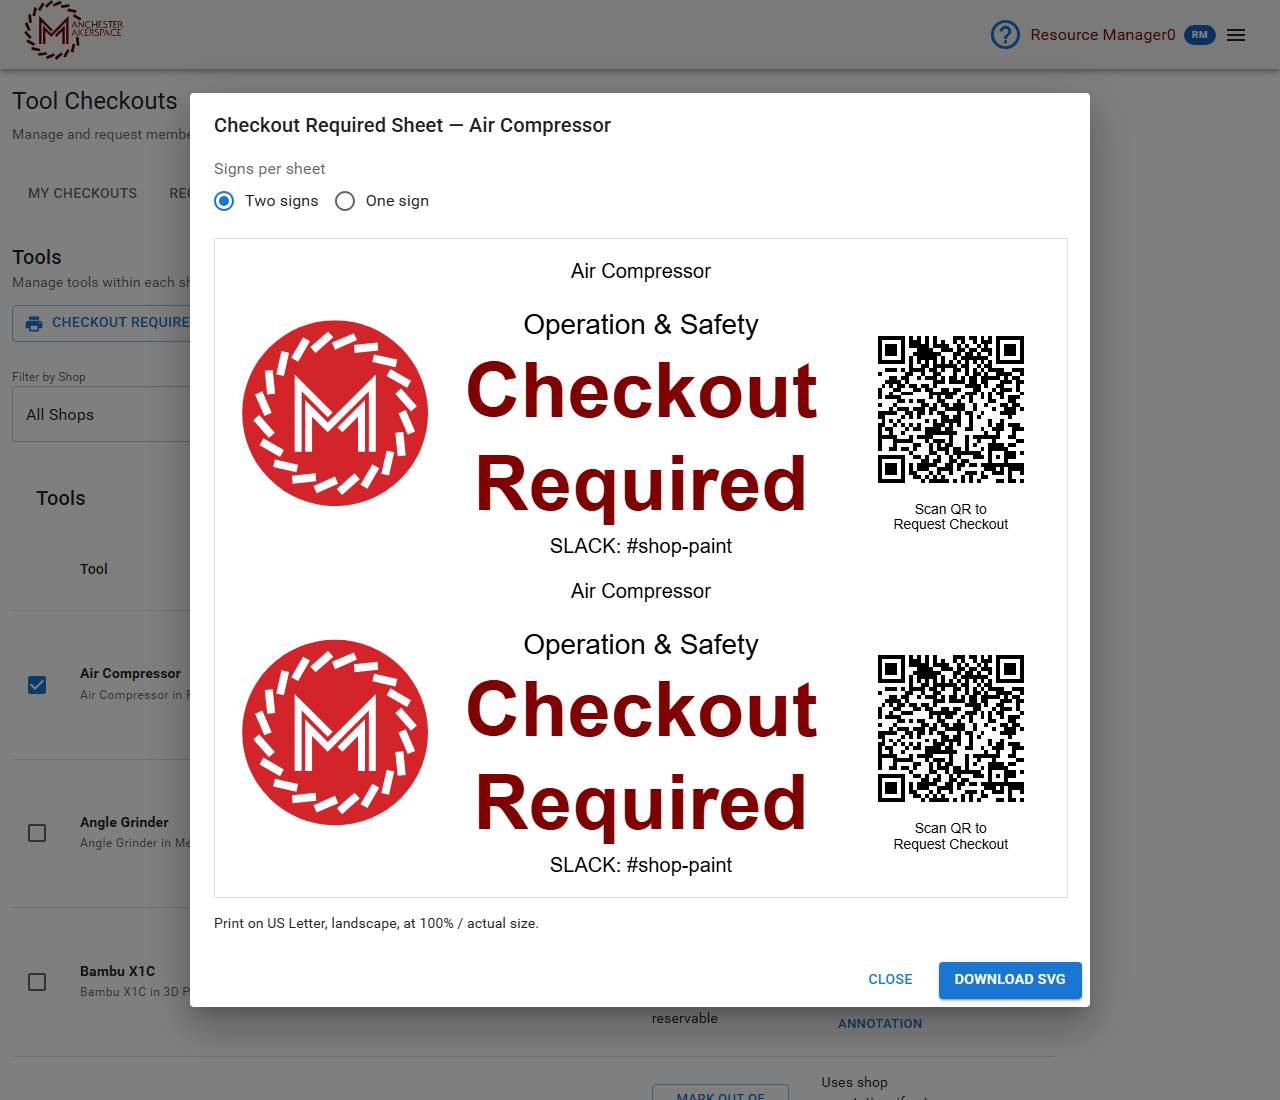
Each sign shows the tool or shop name, Operation & Safety, the round logo, the words Checkout Required, the shop's Slack channel at the bottom, and a QR code captioned Scan QR to Request Checkout. If the shop has no Slack channel set, the footer is blank and a warning shows in the preview, so set the channel first.
The QR code is a permanent link to the tool's public page. Scanning it grants no access by itself: members still have to sign in to request a checkout. The page also shows an Approver? Sign in to check out a member link, which only works for people allowed to check members out on that tool.
If the preview shows The short link is unavailable. Please try again. with a Retry button, click Retry. If it keeps failing, tell an admin, because the site's public address may not be set up correctly.
- Admins and board members can print any eligible sign. RMs can print for their own shops and tools. Approvers can print for tools they are assigned. Tools that do not require a checkout cannot have a sign.
- Groups of tools do not have a sign.
To print only a QR code (for example for a label), use QR Code on the tool or shop.